
Table of Contents
Introduction
In this post we will learn how to decompose a matrix in Excel.
LU decomposition is a useful tool in linear algebra. It decomposes a square matrix into lower and upper triangular matrices which are easier to work with than the original matrix. For a given matrix M using LU decomposition we can find a lower triangular matrix L and an upper triangular matrix U such that L multiplied by U equals M.
To write the LU decomposition function in VBA would be time consuming, potentially error prone, and slow to run. Python on the other hand has some fast libraries for linear algebra that we can take advantage of in Excel using the Excel Python add-in PyXLL.
We will write the lu_decomposition function in Python using the Scipy package and then call that Python function from Excel using PyXLL.
Installing the required dependencies
We will use the Python package Scipy to do the LU decomposition. The Scipy package contains many advanced linear algebra functions that have been well tested and optimised for performance.
If you are using Anaconda you may already have Scipy installed, but if you don’t you can install it by running “conda install scipy”.
For other Python distributions you can install Scipy using the “pip” command, “pip install scipy”.
In order to call our Python function Excel we will use the Excel add-in PyXLL. If you have not already installed this you can do so by following the instructions on the PyXLL website here https://www.pyxll.com/docs/userguide/installation/firsttime.html.
Writing the Python function “lu_decomposition“
We will first write a Python function called “lu_decomposition”, and later we will call that same function from Excel. Our function will take an input matrix as a 2d array of numbers and return a 2d array of numbers. This fits well with Excel since Excel displays numbers in a 2d grid.
The LU decomposition returns two matrices, L and U. We want our function to return a single matrix so that the results can be displayed easily in Excel. So, we will add a second argument to our function to tell it which of the matrices we want to return. We can then call the function twice, once to get the upper matrix and a second time to get the lower matrix.
To do the actual LU decomposition we use Scipy’s “lu” function. This is part of Scipy’s linear algebra package. You can find a lot more details on the Scipy website, and the docs for the linear algebra package can be found here https://docs.scipy.org/doc/scipy/reference/linalg.html.
The Scipy function “lu” returns not only the two matrices L and U but also a thrid matrix P. This is what’s known as the permutation matrix. This is necessary to decompose improper matrices and performs row reordering necessary to decompose the matrix. The full result of the decomposition using this function is “M = P L U“. For properly ordered matrices the P matrix is the identity matrix.
import scipy.linalg as la


def lu_decomposition(input, result):
    # Perform the matrix decomposition using scipy.linalg.lu
	P, L, U = la.lu(input)

    # Return one of the results depending on which one we need
    if result ==  "P":
		return P
	if result ==  "L":
		return L
	elif result ==  "U":
		return U

	raise ValueError("'result' is expected to be one of P, L or U")
We can now test this function to make sure it behaves as expected before we go on to calling it in Excel.
import numpy as np

# Create an input 2d array (a square matrix)
array = np.array([[1,2,3],[3,4,5],[5,6,7]])

# Call the function twice to get the L and the U matrices
L = lu_decomposition(array,"L")
U = lu_decomposition(array,"U")

# Print the results
print(f"L Matrix \n {L}")
print(f"U Matrix \n {U}")
Getting the lu_decomposition function into Excel
Now that we know our Python function works we are ready to call it from Excel. To do this will will use the Excel add-in PyXLL.
If you are new to PyXLL please visit https://www.pyxll.com. There you can find more information about PyXLL, including how to install and configure the add-in.
We are going to use the @xl_func decorator from PyXLL. The xl_func decorator instructs the PyXLL add-in that this function is to be exposed to Excel as a worksheet function. PyXLL will export this function to Excel so we can call it from an Excel worksheet.
The video https://www.pyxll.com/docs/videos/worksheet-functions.html is a good introduction to writing Excel worksheet functions in Python using PyXLL. If you have not written a worksheet function using PyXLL before this video is a good place to start.
To expose our existing function Excel we simply import the @xl_func decorator from the pyxll package and apply it to our function. We want PyXLL to convert the values we pass it into a numpy array so we pass a signature string to the xl_func decorator telling it what types the arguments are expected to be, and what the return type is.
import scipy.linalg as la

# Import the xl_func decoroator from PyXLL
from pyxll import xl_func

# And apply it to our function with a signature string
@xl_func("numpy_array input, string result: numpy_array")
def lu_decomposition(input, result):
    # Perform the matrix decomposition using scipy.linalg.lu
	P, L, U = la.lu(input)

    # Return one of the results depending on which one we need
    if result ==  "P":
		return P
	if result ==  "L":
		return L
	elif result ==  "U":
		return U

	raise ValueError("'result' is expected to be one of P, L or U")
You can find more about how PyXLL handles argument and return types in the user guide here https://www.pyxll.com/docs/userguide/udfs/argtypes.html.
Finally we need to update the PyXLL config file, pyxll.cfg. In the config file there is a list of modules that PyXLL imports when Excel starts (and when PyXLL reloads). Add the module we’ve just written to that list of modules so that PyXLL will load it. You may also need to add the folder containing the Python module to the pythonpath in the same config file.
Calling the Python function from Excel
Now we are ready to test this function in Excel. Once you have PyXLL installed and have updated your config, open Excel and the PyXLL add-in will load our Python module and the function will be available to call. If you had already started Excel, use PyXLL’s reload feature from the ribbon tab to reload the Python code.
To call the function from Excel we enter “=lu_decomposition(…)” and pass it a 2d array of numbers. The first argument to the lu_decomposition function is the square matrix we want to decompose, and the second argument is one of “P”, “L” or “U”, depending on which matrix we want to be returned.
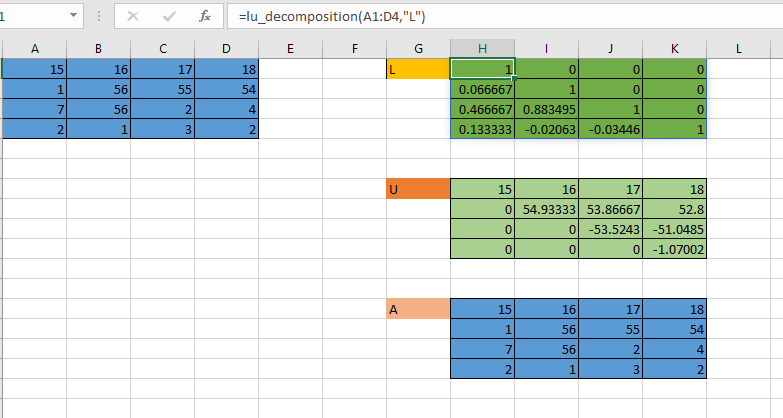
After obtaining the P, L and U matrices we can multiply then together and check the result is the same as our original input matrix. For properly ordered matrices the permutation matrix P will be the identity matrix.
Conclusion
Scipy contains many advances linear algebra routines that are not available to us using Excel alone. By using PyXLL we can make these complex routines available in Excel. Using a well tested and high performance library like Scipy can be a much better choice than trying to reinvent the wheel and implement complex routines in VBA, especially if you care about accuracy or performance!
It’s not just Scipy that we can use from Excel. If you are already a Python developer you will no doubt already have your own prefered packages and your own library of existing code. You can call any Python code in Excel using PyXLL, making Excel a super-powerful front end to your Python tools.
If you are not already a Python developer but are interested in how you can get more out of Excel by using Python, we have some resources to help you. You can find them at https://www.pyxll.com/learn-python.html.
References
- Scipy: https://scipy.org/
- PyXLL: https://www.pyxll.com
- Python learning resources: https://www.pyxll.com/learn-python.html