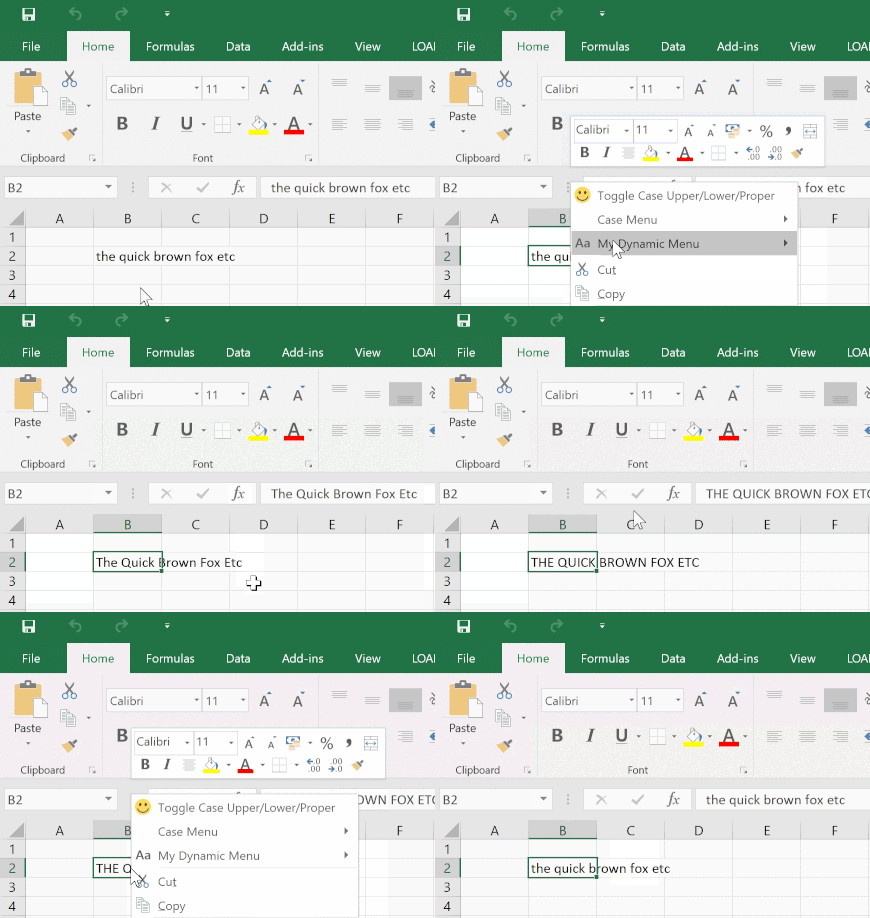
Context menus are the menus that appear in Excel when your right-click on something, most usually a cell in the current workbook.
These context menus have become a standard way for users to interact with their spreadsheets and are an efficient way to get to often used functions.
With PyXLL you can add your own Python functions to the context menus.
The context menu customizations are defined using the same XML file used when customizing the Excel ribbon (see Customizing the Ribbon). The XML file is referenced in the config with the ribbon setting. This can be set to a filename relative to the config file, or as an absolute path.
The ribbon XML file uses the standard Microsoft CustomUI schema. This is the same schema you would use if you were customizing the ribbon using COM, VBA or VSTO and there are various online resources from Microsoft that document it [1]. For adding context menus, you must use the 2009 version of the schema or later.
Actions referred to in the ribbon XML file are resolved to Python functions. The full path to the function must be included (e.g. “module.function”) and the module must be on the python path so it can be imported. Often it’s useful to include the modules used by the ribbon in the modules list in the config so that when PyXLL is reloaded those modules are also reloaded, but that is not strictly necessary.
Create a new ribbon xml file, or add the contextMenus section from below to your existing ribbon xml file.
Note that you must use the 2009 version of the schema in the customUI element, and the contextMenus
element must be placed after the ribbon element.
<?xml version="1.0" encoding="UTF-8"?>
<customUI xmlns="http://schemas.microsoft.com/office/2009/07/customui">
    <ribbon>
        <!-- The ribbon and context menus can be specified in the same file -->
    </ribbon>
    <contextMenus>
        <contextMenu idMso="ContextMenuCell">
            <button id="MyButton" label="Toggle Case Upper/Lower/Proper"
                insertBeforeMso="Cut"
                onAction="context_menus.toggle_case"
                imageMso="HappyFace"/>
        </contextMenu>
   </contextMenus>
</customUI>
In the xml above, insertBeforeMso is used to insert the menu item before the existing “Cut” menu item.
This may be removed if you want the item placed at the end of the menu. Also, imageMso may be replaced
with image and set to the path of an image file rather than using one of Excel’s built in bitmaps (see
load_image).
If you’ve not already done so, set ribbon in the config file to the filename of the ribbon XML file.
[PYXLL]
ribbon = <full path to xml file>
Create the context_menus module with the filename context_menus.py and
add the toggle_case function. Note that the module name isn’t important, only that
it matches the one referenced in the onAction handler in the xml file above.
from pyxll import xl_app

def toggle_case(control):
    """Toggle the case of the currently selected cells"""
    # get the Excel Application object
    xl = xl_app()

    # iterate over the currently selected cells
    for cell in xl.Selection:
        # get the cell value
        value = cell.Value

        # skip any cells that don't contain text
        if not isinstance(value, str):
            continue

        # toggle between upper, lower and proper case
        if value.isupper():
            value = value.lower()
        elif value.islower():
            value = value.title()
        else:
            value = value.upper()

        # set the modified value on the cell
        cell.Value = value
Add the module to the pyxll config [2].
[PYXLL]
modules = context_menus
Start Excel (or reload PyXLL if Excel is already started).
If everything has worked, you will now see the “Toggle Case” item in the context menu when you right click on a cell.

Sub-menus can be added to the context menu using the menu tag.
The following adds a sub-menu after the “Toggle Case” button added above.
<?xml version="1.0" encoding="UTF-8"?>
<customUI xmlns="http://schemas.microsoft.com/office/2009/07/customui">
    <ribbon>
        <!-- The ribbon and context menus can be specified in the same file -->
    </ribbon>
    <contextMenus>
        <contextMenu idMso="ContextMenuCell">
            <button id="MyButton" label="Toggle Case Upper/Lower/Proper"
                insertBeforeMso="Cut"
                onAction="context_menus.toggle_case"
                imageMso="HappyFace"/>
            <menu id="MySubMenu" label="Case Menu" insertBeforeMso="Cut"  >
                <button id="Menu1Button1" label="Upper Case"
                    imageMso="U"
                    onAction="context_menus.toupper"/>
                <button id="Menu1Button2" label="Lower Case"
                    imageMso="L"
                    onAction="context_menus.tolower"/>
                <button id="Menu1Button3" label="Proper Case"
                    imageMso="P"
                    onAction="context_menus.toproper"/>
            </menu>
        </contextMenu>
   </contextMenus>
</customUI>
The additional buttons use the following code, which you can copy to your context_menus.py module.:
def tolower(control):
    """Set the currently selected cells to lower case"""
    # get the Excel Application object
    xl = xl_app()

    # iterate over the currently selected cells
    for cell in xl.Selection:
        # get the cell value
        value = cell.Value

        # skip any cells that don't contain text
        if not isinstance(value, str):
            continue

        cell.Value = value.lower()


def toupper(control):
    """Set the currently selected cells to upper case"""
    # get the Excel Application object
    xl = xl_app()

    # iterate over the currently selected cells
    for cell in xl.Selection:
        # get the cell value
        value = cell.Value

        # skip any cells that don't contain text
        if not isinstance(value, str):
            continue

        cell.Value = value.upper()


def toproper(control):
    """Set the currently selected cells to 'proper' case"""
    # get the Excel Application object
    xl = xl_app()

    # iterate over the currently selected cells
    for cell in xl.Selection:
        # get the cell value
        value = cell.Value

        # skip any cells that don't contain text
        if not isinstance(value, str):
            continue

        cell.Value = value.title()
As well as statically declaring menus as above, you can also generate menus on the fly in your Python code.
A dynamic menu calls a Python function to get a xml fragment that tells Excel how to display the menu. This can be useful when the items you want to appear in a menu might change.
The following shows how to declare a dynamic menu.
<?xml version="1.0" encoding="UTF-8"?>
<customUI xmlns="http://schemas.microsoft.com/office/2009/07/customui">
    <ribbon>
        <!-- The ribbon and context menus can be specified in the same file -->
    </ribbon>
    <contextMenus>
        <contextMenu idMso="ContextMenuCell">
            <dynamicMenu id="MyDynamicMenu"
                label= "My Dynamic Menu"
                imageMso="ChangeCase"
                insertBeforeMso="Cut"
                getContent="context_menus.dynamic_menu"/>
        </contextMenu>
   </contextMenus>
</customUI>
The getContent callback references the dynamic_menu function in the context_menus module.:
def dynamic_menu(control):
    """Return an xml fragment for the dynamic menu"""
    xml = """
         <menu xmlns="http://schemas.microsoft.com/office/2009/07/customui">
            <button id="Menu2Button1" label="Upper Case"
                imageMso="U"
                onAction="context_menus.toupper"/>

            <button id="Menu2Button2" label="Lower Case"
                imageMso="L"
                onAction="context_menus.tolower"/>

            <button id="Menu2Button3" label="Proper Case"
                imageMso="P"
                onAction="context_menus.toproper"/>
         </menu>
    """
    return xml